Please note this information is for educational purposes only and procedures should not conducted based on this information. OSCEstop and authors take no responsibility for errors or for the use of any content.
Introduction
- Wash hands, Introduce self, Patients name & DOB & wrist band, Explain procedure and get consent from parents (or child if appropriate)
- Analgesia options (not for neonates)
- Topical local anaesthetic cream (e.g. Ametop) applied under a film dressing – takes 45 minutes to work
- Ethyl chloride ‘cold’ spray
- Depending on age of child, ensure 1-2 assistants are available to hold child still and help secure the cannula
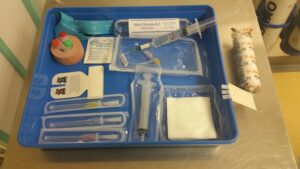
Equipment
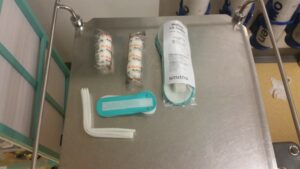
Bandage/splint

Paediatric blood bottles
Preparation part
- Wash hands
- Clean tray
- Gather equipment around tray (think through what you need in order)
Equipment list


- Gloves (+ extra pair and apron if need to draw up flush)
- Disposable tourniquet (for >10 year olds only)
- Ethyl chloride spray (if required)
- Alcohol 70%/chlorhexidine 2% skin cleansing wipe
- Cannula
- Yellow (24G) for neonates/infants
- Blue (22G) for toddlers/small children
- Pink (20G) for older children
- Blood tubes if required
- Green (coagulation) – clotting – minimum volume required 1.3ml
- Orange (Lithium-heparin) – U&Es and other biochemistry
- Red (EDTA) – FBC
- Blood culture (yellow top) – minimum volume required 1ml
- G&S is taken in an adult purple EDTA tube – minimum volume 1/3 of the tube; must be labelled by hand
- If using a yellow cannula, open the bottles in advance and support in a roll of tape so it is easy to collect dripping blood
- If using a blue/pink cannula, also get a 10ml syringe to aspirate blood from the end of the cannula before decanting
- Cotton gauze swabs
- Steri-strips (to help secure cannula)
- Cannula sticky dressing
- Pre-prepared flush (or 10ml 0.9% saline + 10ml syringe + green 21G needle) (CHECK DATE)
- Paediatric cannula extension set (+ alcohol 70%/chlorhexidine 2% device cleansing wipe)
- Tape
- Bandage and appropriately sized plastic hand cradle (to prevent hand moving in younger patients)
- Wash hands
- Open packets and place equipment neatly in tray in plastic parts of packets (without touching the instruments themselves)
- If flush is not pre-prepared:
- Put on an extra pair of gloves + apron
- Put needle on 10ml syringe and draw up the 10ml 0.9% saline
- Remove needle and dispose in sharps bin
- Expel air and place back in syringe packaging
- Bin waste (+ gloves if not priming cannula extension set)
- Priming cannula extension set
- Leave gloves on from preparing flush (or put gloves on if flush was pre-prepared)
- Prime Octopus by flushing ̴1ml flush in each lumen
- Lock both ports
- Put into tray
- Remove gloves, apron and bin waste
- Return to patient (with tray and sharps bin)
Patient part
Vein identification
- Wash hands
- Identify suitable vein – in older children, try to find a vein you can feel; in infants/neonates, look for a suitable vein (dorsal hand is usually best)
- Tourniquet
- Neonate/infant: if using the dorsal hand, hold their wrist flexed with your non-dominant hand with your index and middle fingers over the dorsum and your thumb over their fingers
- <10 years, assistant can squeeze limb
- >10 years, use rubber tourniquet
Procedure
- Wash hands
- Put on gloves
- Sterilise area – wipe in spiral motion working outwards and wait 30 seconds for it to dry
- Re-apply tourniquet if using one
- Anchor the skin distally with non-dominant hand and insert the cannula with bevel upright at 10-15˚ to the skin with the dominant hand
- When flashback is observed, advance the cannula body into the vein whilst holding the end of the needle steady
- When the cannula body has been fully inserted (with the needle still balancing partially in the cannula), apply initial dressings (steri-strips ± cannula sticky dressing)
- Place your non-dominant hand’s thumb securely over the end of the cannula body (± proximal part of the vein to stem blood flow), while also using that hand to hold the patient’s limb still. Maintain this for the rest of the procedure.
With your dominant hand…
- Place a cotton wool gauze underneath the cannula end if practical
- Remove the needle fully and drop it into the sharps box immediately
- If bloods are required
- If using a yellow cannula, collect blood by placing open tubes under the back of the cannula and allow blood to drip into the tubes
- If using a blue/pink cannula, attach a 10ml syringe to the end of the cannula and aspirate the required amount of blood
- Remove tourniquet if present
- Attach the cannula extension set onto the end of the cannula
- Clean port and flush with 5-10ml of saline
- Remove gauze and clean any blood spillage
- For small cannulas, it is best for an assistant to secure it while you continue to hold the cannula in place
- If not already done, apply steri-strips (one over the top, and one below and around like a ribbon) and then cannula sticky dressing to secure cannula position
- If required, place the patients hand in a plastic hand cradle and secure using the Velcro straps; then place some folded gauze under the end of the cannula and apply tape around the circumference of the cradled arm to secure
- Bandage around the cannula (and hand cradle if used) but ensure the cannula extension end is accessible
Want to find out how 99% of people passed their exams?
To complete
- Thank patient and parents
- Label and send bloods if taken
- Bin waste and gloves
- Clean tray, wash hands
- Complete a peripheral cannula observation chart