Please note content is for educational purposes only and procedures should not conducted based on this information. OSCEstop and authors take no responsibility for errors or for the use of any content.
Introduction
Wash hands, Introduce self, Patients name & DOB & wrist band, Explain procedure and get consent
Explain risks and benefits
Check for contraindications
Local anaesthetic allergy
Neurovascularly compromised limb
Infection at insertion site
Therapeutic anti-coagulants (e.g. warfarin) or clotting abnormality (relative contraindication)
Preparation
Wash hands
Put on apron
Clean a trolley
Gather equipment onto bottom of trolley (think through what you need in order)
Open sterile pack to form a sterile field on the top of the trolley
Open packets (without touching the instruments themselves) and drop sterile instruments neatly into the sterile field
Positioning and exposure
Expose the site
Position patient
Locate insertion point
Preparation
Wash hands
Apply sterile gloves (but note, it’s not a sterile procedure)
Sterilize area – work from middle outwards in a spiral motion (using cleansing snap-sponge)
Draw up anaesthetic
Snap open local anaesthetic bottle and hold open upside-down
Draw up local anaesthetic using a drawing-up needle on 10-20ml syringe
Block administration
Notes: 1. if paraesthesia occur during procedure, withdraw needle 2-3mm before injecting local anaesthetic; 2. always aspirate before injecting local anaesthetic to ensure you are not in a vessel; 3. If you enter a vessel, withdraw needle, apply pressure and re-attempt after 5-10 minutes
Digital nerve (’ring’) block
Used for analgesia for any finger procedures.
Use an orange needle on 10ml syringe to infiltrate anaesthetic
Options
Digital nerve block at base of finger (DORAL APPROACH): use two entry points – one on each side of the base of the digit between the MCPJ and PIPJ. Insert needle perpendicular to finger (with a slight medial angulation) and infiltrate 2-3ml 1% lidocaine either side when the needle is close to the flexor surface
Digital nerve block at metacarpal level (PALMAR APPROACH): use two entry points – one to each side of the flexor tendon on the digit in the distal palmar crease. Insert needle perpendicular to skin and infiltrate 3-4ml 1% lidocaine either side
Always aspirate before injecting to confirm the needle is not in a vessel
Colles’ fracture haematoma block
Used for analgesia for Colles’ fracture manipulations (not technically a ‘nerve’ block).
During preparation
Explain it’s painful!
Apply 3-lead cardiac monitoring to patient
Palpate the fracture step on the dorsal surface of the forearm
Ensure complete asespsis (you are technically converting a closed fracture into an open one)
Infiltrate a small amount of subcutaneous local anaesthetic with orange needle
Change to green needle and insert at about 45-90˚, at or just slightly proximal to the fracture site on the dorsal surface of the forearm
Step down the bone with the needle until you get to the break
Aim to penetrate the needle in between the fractured ends (may need to dig around a bit)
Aspirate frequently – when you are in the haematoma, altered blood will be aspirated
Infiltrate the lidocaine, keeping an eye on the cardiac monitor
Aim to infiltrate around 10ml 1% lidocaine total into the haematoma (always aspirating when you move the needle to check you are in the haematoma)
Fascia iliaca compartment block
Used for analgesia for neck of femur fractures (a safer way to block the femoral nerve which is in the compartment).
During preparation
Check patient is not on therapeutic anticoagulants (e.g. warfarin)
Prepare equipment
Blunt the end of a green needle by slightly bending the end away from the bevel by pressing it on the inside of its plastic sheath on a hard surface
Draw up bupivacaine, into one 20ml and one 10ml syringe
Attach needle to octopus extension line then a bupivacaine filled syringe and flush to expel air
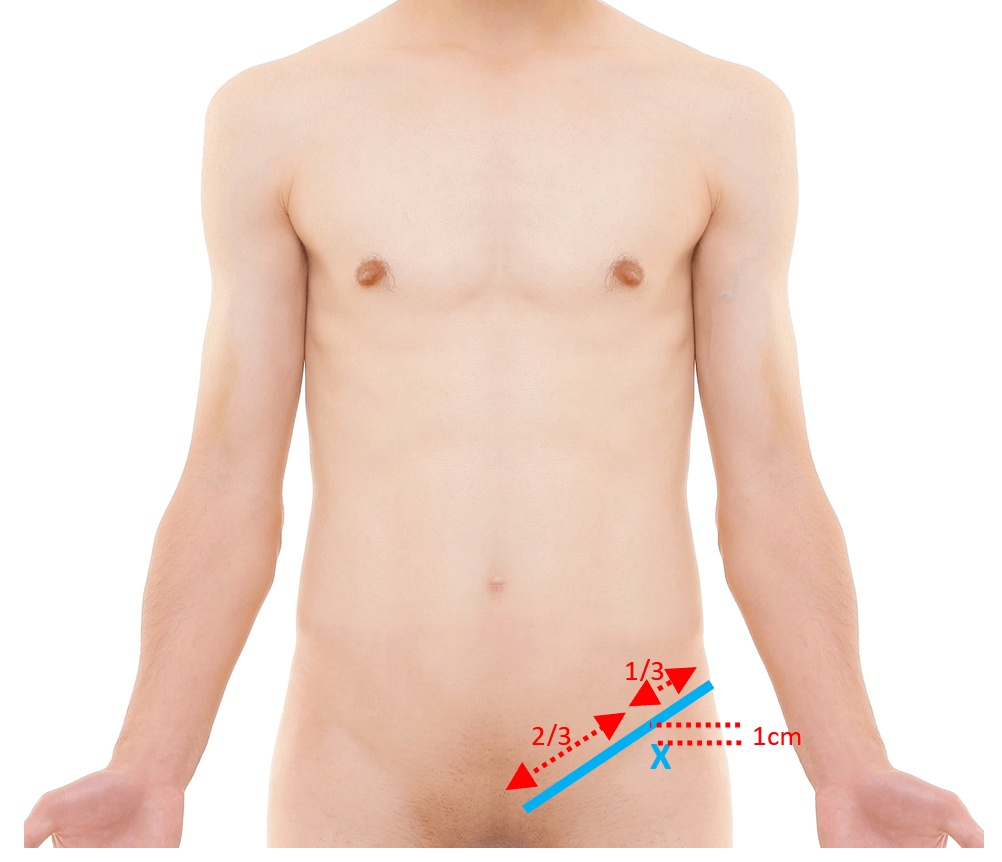
Locate insertion site (image below)
Palpate the anterior superior iliac spine and the pubic tubercle
Visualise line between and divide into thirds
Insertion point is 1cm below the point between the lateral third and the medial two thirds
Palpate the femoral pulse to ensure you are not too close to it
Mark insertion side with an indentation using a nail/biro
Insert needle perpendicular to skin
Advance the needle slowly until 2 ‘pops’ are felt (as the needle penetrates the fascia lata and then fascia iliaca)
Aspirate to confirm the needle is not in a vessel
Infiltrate around 30ml 0.25% bupivacaine (re-aspirate after every 5ml to check not in a blood vessel)
When first syringe empty, hold needle steady and change to second syringe to continue infiltrating bupivacaine
Fascia iliaca compartment block site
Bier’s block
Sometimes used for Colles’ fracture manipulations or minor surgery below the elbow (this is a regional IV block, not a ‘nerve’ block, so is completely different to other blocks described).
A doctor who can deal with severe toxic reactions must be present
During preparation
Perform pre-op assessment (ensure patient has been NBM for 4 hours, perform pre-procedure observations etc)
Ensure no contraindications: severe hypertension/obesity, peripheral vascular disease, Raynauds, sickle cell trait/disease, methaemoglobulinaemia, age <7 years, uncooperative patient, procedure will take >30 mins or need tourniquet to be released, epilepsy is relative contraindication
Obtain written consent
Prepare equipment
Special tourniquet (with 15cm wide cuff)
40ml 0.5% prilocaine (30ml if elderly/frail)
Ensure intralipid and resuscitation equipment is closely available
Apply cardiac leads, BP and oxygen saturation monitoring
Insert cannula into dorsum of hand on affected side and ensure there is one on the other side if it is needed for toxic reactions
Place tourniquet around upper arm over padding but do not inflate yet
Elevate arm for 3 minutes while occluding the brachial artery
While arm is still elevated, inflate cuff to 300mmHg or 100mmHg above SBP
Record the tourniquet time and ask somebody to observe tourniquet patency throughout
Bring arm back down and inject 40ml 0.5% prilocaine (30ml if elderly/frail) – arm will become mottled
Flush with 10-15ml saline if anaesthesia is inadequate
Remove the cannula
Complete the procedure
Note the cuff must be inflated for a minimum of 20mins and maximum of 45mins.
Deflate tourniquet slowly and record the time
Perform post-procedure observations and observe patient for at least 30 minutes post-procedure
Other nerve blocks (injection sites)
Almost any nerve can be blocked by infiltrating 1% lidocaine around the nerve using a small needle (e.g. orange). You must know the cutaneous innervation of the nerve you intend to block and the regional anatomy well. Insert the needle with the bevel in the line of the nerve (reduces risk of transecting nerve fibres). For deeper nerves, the needle is usually inserted vertically, but for superficial nerves (subcutaneous nerve blocks) it is inserted at <30˚.
Wrist
Median nerve: ask patient to flex wrist slightly and touch thumb to little finger – insert needle vertically to depth of 1cm at proximal wrist skin crease on volar surface of wrist between palmaris longus and flexor carpi radialis tendons which should now be visible – carpal tunnel syndrome is contraindication
Ulnar nerve: insert needle vertically on volar surface of wrist between ulnar artery and flexor carpi ulnaris tendon at level of ulnar styloid process – check radial artery patency first
Radial nerve: infiltrate subcutaneously around radial side of dorsum of wrist from flexor carpi radialis tendon to radio-ulnar joint
Leg
Femoral nerve: insert needle vertically 1cm lateral to femoral pulse, to a depth of ~3cm
Ankle
Saphenous nerve: infiltrate subcutaneously anterior to and just above the medial malleolus
Superficial peroneal nerve: infiltrate subcutaneously above ankle joint from lateral malleolus to anterior tibial border
Deep peroneal nerve: above the ankle joint between the tibialis anterior and extensor halluces longus tendons
Sural nerve: insert needle just lateral to the Achilles tendon and infiltrate subcutaneously while advancing to lateral malleolus
Tibial nerve: palpate posterior tibial artery then insert needle just medial to the Achilles tendon, at level of the upper border of the medial malleolus and infiltrate 5-10ml just lateral to the artery
Ear
Greater auricular nerve: 1cm below ear lobe from posterior SCM border to angle of mandible)
Lesser occipital nerve: just behind ear
Auriculotemporal nerve: just anterior to external auditory meatus – warning – it’s close to the superficial temporal artery
Forehead
Supraorbital and supratrochlear nerves: infiltrate subcutaneously above medial border of eyebrow by inserting needle in midline and directing it laterally
Comments are closed for this post.