Please note content is for educational purposes only and procedures should not conducted based on this information. OSCEstop and authors take no responsibility for errors or for the use of any content.
For management options by fracture type, see OSCEstop notes onfracture management.
Introduction
Wash hands, Introduce self, Patients name & DOB & wrist band, Explain procedure and get consent
Risks: neurovascular compromise, joint stiffness after removal, infection, pressure sores, venous thromboembolism, failure of fracture union
Backslabs vs casts: for acute injuries, a ‘backslab’ (i.e. slab of plaster on one side of the limb) should be used to allow for swelling. This is then changed to a more secure full ‘cast’ (i.e. circumferential around limb) at ̴ 1 week post injury.
Check cast prescription
Preparation part
Wash hands
Apply an apron, and also gloves if using fibreglass
Gather equipment
Equipment list
Large pads and plastic sheets
Plastic covered pillows
Webril cotton wool roll for under padding – 5-10cm width for upper limb, 10-15cm width for lower limb
Plastic bowel filled with lukewarm water (the warmer the water the faster the cast will set)
Heavy duty scissors
For backslabs:
Plaster Of Paris sheets (usually come from a huge roll) – 15cm width for posterior backslabs, 10cm width for lateral/medial backslabs
Broad gauze bandage roll (outer layer)
For casts:
Fabric stockinette (1st inner layer) – 5cm width for upper limb, 7.5cm width for lower limb
2x Fibreglass rolls (e.g. Benecast) or, less commonly, Plaster Of Paris rolls (small individually wrapped rolls) – 5cm width for upper limb casts, 10cm width for lower limb casts
Patient part
Positioning and exposure
Expose limb and remove any jewellery
Examine the injured extremity
Look for wounds and treat prior to applying cast
Examine neurovascular status
Reduce the fracture or dislocation if required
Position patient
Below elbow cast: patient sitting with elbow resting on hard surface and hand slightly elevated
Above elbow cast: patient lying supine with arm off side of bed and assistant holding the patient’s hand to support the weight of the arm
Below knee cast: patient sit on edge of bed with lower legs dangling off side
Above knee cast: patient lying supine with leg rest/assistant holding leg in position
Fully position limb in desired position – SEE TABLE BELOW
Apply large pads and plastic sheets around patient and limb to collect spillage
Initial dressing
Apply the fabric stockinette over the limb to cover the area below the plaster plus a couple of inches and cut to size – avoid wrinkles and cut hole for thumb if needed (omit this in acute injuries)
Unroll the webril circumferentially around the limb to cover the area below the plaster plus a couple of inches (roll layers should overlap by 50%). Start with two initial rolls then progress distally/proximally. Use double thickness for both plaster ends and any bony prominences. Cut a hole/slit for the thumb if required. The end can be left loose.
Apply extra squares of webril may be applied over any bony prominences to avoid pressure sores
Backslap application
Using the correct width plaster sheet (unrolled), measure the length required longitudinally along the limb
Fold the plaster sheet to the create required layers – layers required vary by type of backslab – see table below (generally, 8 layer slab for upper limb; three 4 layer slabs for lower limb backslabs)
Cut plaster sheet to size
Immerse the plaster into the lukewarm water and hold it under until the bubbles stop
Drain the plaster until the drips stop (do not wring it out)
Place the slab longitudinally in position over limb (fold any un-neat edges)
Mould by rubbing it smooth with flats of both palms and fingers
Turn the ends of the webril back over the ends of the plaster
Unroll the broad gauze bandage circumferentially around the limb to secure the plaster and free ends of webril (roll layers should overlap by 50%). Start distally and wrap proximally. To tie off the bandage, you can tape it or split the end down the middle, wrap around in opposite directions and tie off.
Hold the limb is in the correct position for approximately 5mins until the plaster hardens
Circumferential cast application
Immerse the first roll of fibreglass/plaster (still rolled) into the lukewarm water and hold it under until the bubbles stop
Drain until the drips stop (do not wring it out)
Apply the 1st layer by unrolling the fibreglass/plaster circumferentially around limb keeping the roll in contact with the arm at all times. Start distally and progress proximally (roll layers should overlap by 50%)
Continue using the same roll to apply a 2nd layer starting proximally and progressing distally
‘Laminate’ plaster by rubbing the plaster smooth with flats of both palms and fingers in a circular motion in the direction it was placed on to make sure all the fabric lines are out
Turn the ends of the stockinette and webril back over the ends of the plaster
Now apply a 3rd layer (using the second fibreglass/plaster roll which again needs to be soaked and drained), starting proximally and progressing distally like the 2nd to secure the turned-over ends of the stockinette and webril and ensure even cast thickness
‘Laminate’ plaster further
Hold the limb is in the correct position for approximately 5mins until the plaster hardens
Fur upper limb casts, give the patient a resting triangular or high-arm sling
Review patient
Once the backslab/cast is set check:
No sharp edges
Correct positioning
Comfortable for patient
Distil neurovascular assessment and tendon function
Post-cast X-ray
24 hours cast check
If problems arise e.g.
Pressure sores – a ‘window’ can be cut in the cast
Infection – smelling the cast is a good indicator
Give the patient a leaflet and give plaster advice (including advising them to seek urgent medical help if limb is numb/painful/cold/discoloured, POP must be kept dry and that, for weight bearing-lower limb plaster casts, they must not weight bear for 2 days)
Fully document in notes and sign cast prescription
Book follow up appointment
Removing a cast
Use plaster-cutting shears or an oscillating power saw
Shears: only oscillate the handle furthest from the plaster (keep the other one still and parallel to the plaster). You should only cut the plaster layer (i.e. place the blade between the plaster and the lining below)
Start distally and work proximally
Oscillating power saw: use one hand to hold the saw handle nearest the blade, and rest the other hand around the cast with the thumb on the top of the saw to guide it. DO NOT slide the saw along the cast, use it by pressing it down in one position until it ‘gives’ then lift it off and do the same again slightly further down the cast and so on (don’t worry, the saw does not cut skin!)
Start proximally and work distally
Cuts should be over soft tissues and concavities (avoid bony prominences)
Where to cut upper limb casts
Make one cut in a straight line along the anterior border of the forearm from the mid-antecubital fossa to the mid-palm
Now use strength to split the cast to get it off
Where to cut lower limb casts
Requires two cuts
LATERAL CUT: from the little toe, along the lateral border of the foot, below and posterior to the lateral malleolus and up the lateral border of the lower leg
MEDIAL CUT: along the corresponding line on the medial surface
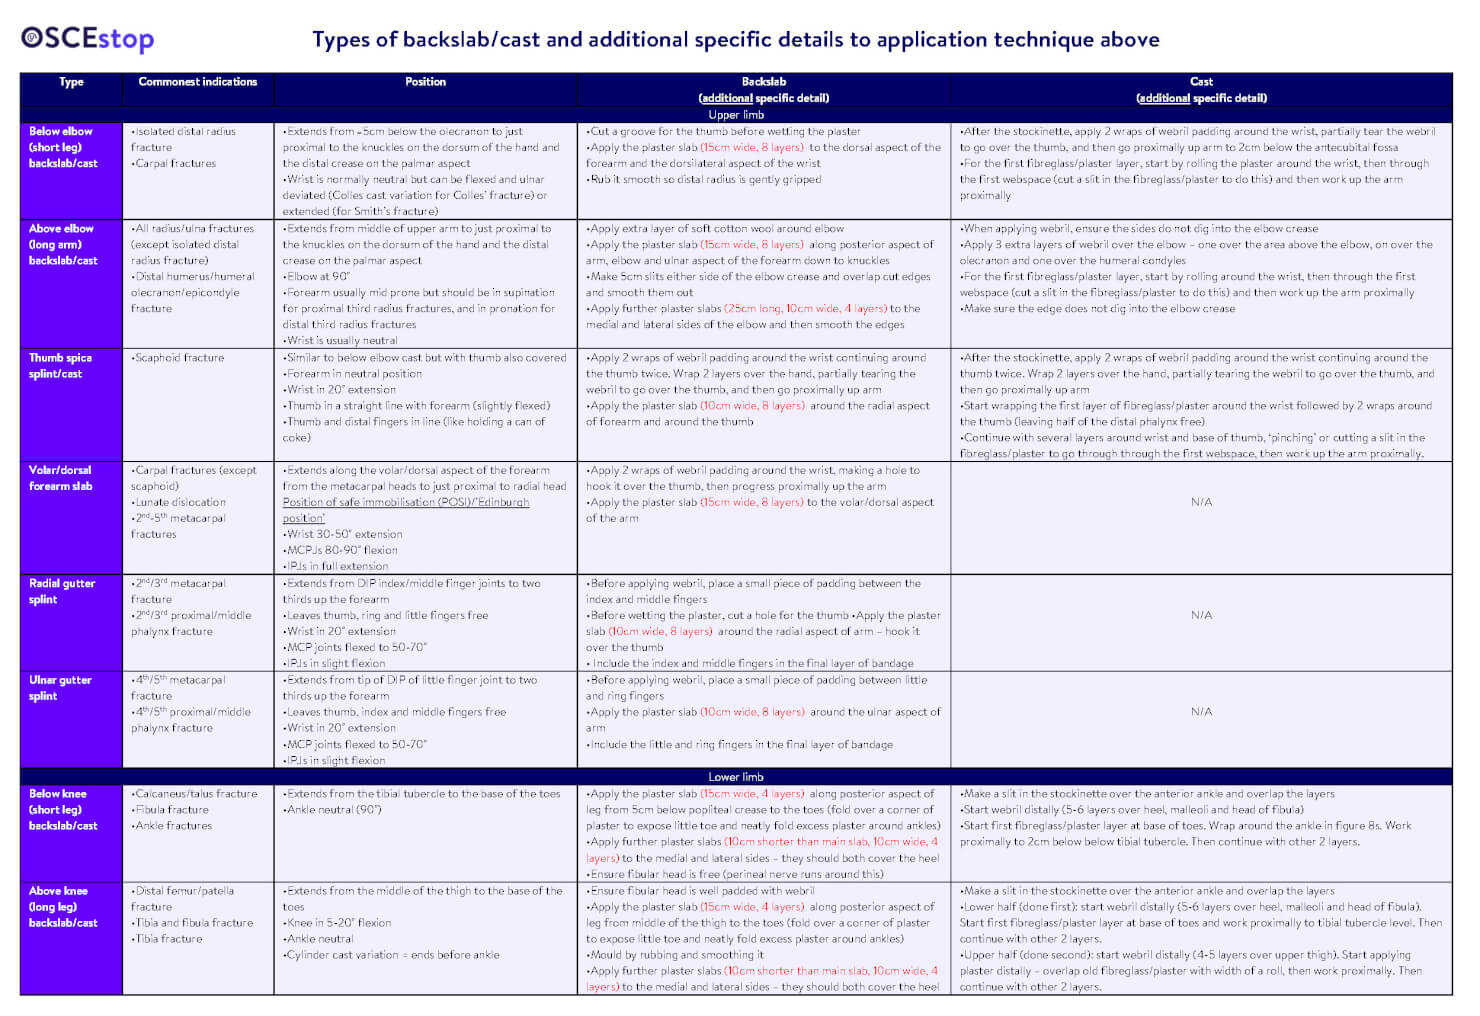
Types of backslab/cast and additional specific details to application technique above
Learn more here…
There’s more learning on fracture management here!
Comments are closed for this post.