Please note content is for educational purposes only and procedures should not conducted based on this information. OSCEstop and authors take no responsibility for errors or for the use of any content.
Trauma patients who should have C-spine immobilised
Although generally don’t immobilise if all of: GCS 15 (and not intoxicated) + no neck pain/tenderness + normal motor/sensory exam + no distracting injury
If neck is not in neutral position, ask patient to actively (or do it passively if not possible), place neck into neutral position – stop if any pain, worsening neurological symptoms or resistance and splint in current position
Instruct assistant to maintain manual C-spine stabilisation until patient is completely immobilised (done from cranial end of patient looking caudally… either by placing hands securely around either side of patient’s head or, holding the superomedial portion of the patient’s trapezius either side with thumbs anteriorly and fingers posteriorly, and clamping their head in between forearms parallel to their neck)
Backboard/firm trolley
Apply backboard/scoop (if pre-hospital) or ensure patient is on a firm, flat trolley (if in hospital)
Cervical collar
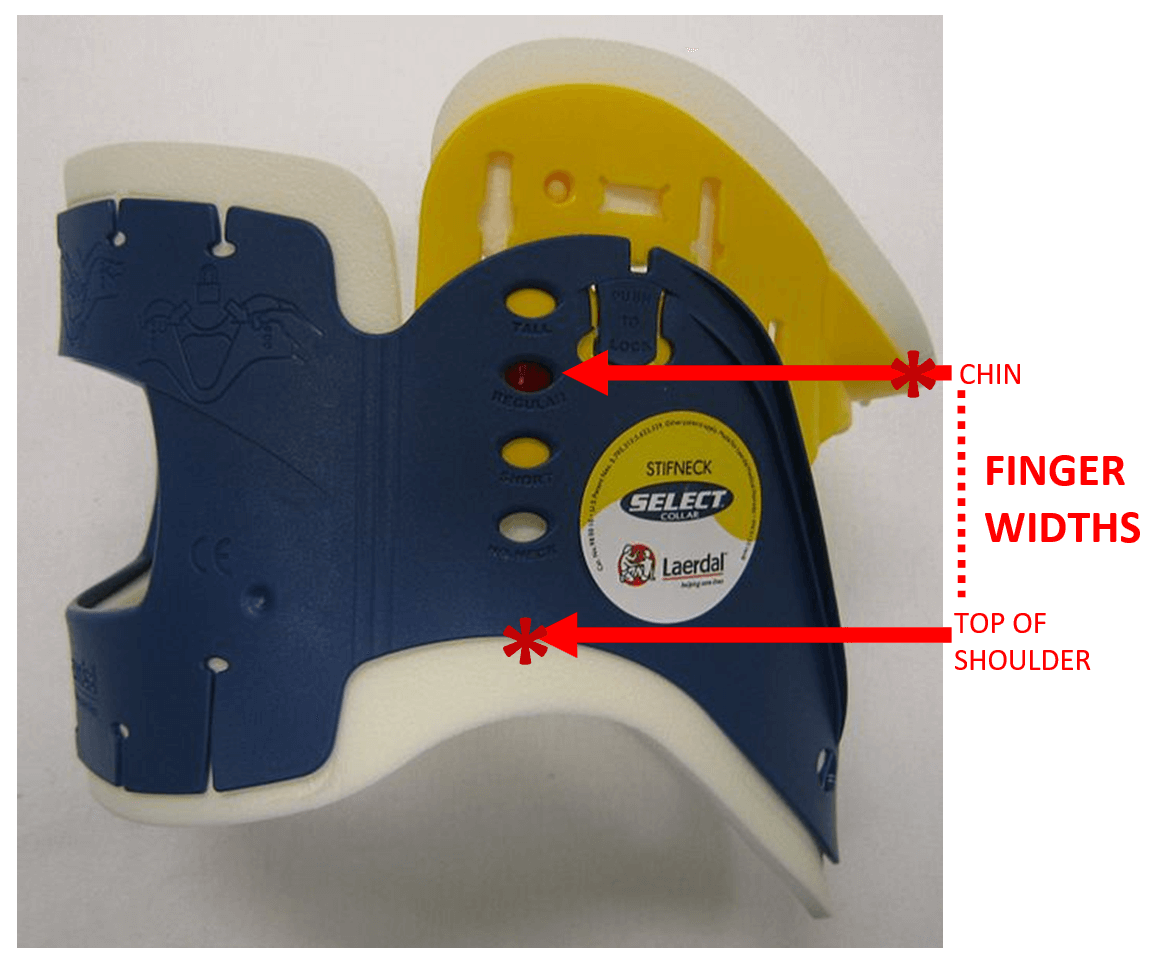
Determine collar size
Using finger widths, measure the vertical distance from the top of the shoulder (where the collar will sit) to an imaginary horizontal line from the bottom of the chin
Then find an appropriate collar size and adjust so that the distance between the marker/stud to the bottom of the collar’s plastic (not foam) is equal to the finger widths measured on the patient
Insert the strap end of the collar under the patient’s neck
Secure the collar using Velcro strap
Cervical collar
Supportive blocks
Apply supportive blocks either side of their head
Apply two tapes to secure:
Right side of bed/backboard → over inferior part of the right block → across chin part of cervical collar → over inferior part of the left block → left side of bed/backboard
Right side of bed/backboard → over superior part of the right block → across patient’s forehead → over superior part of the left block → left side of bed/backboard
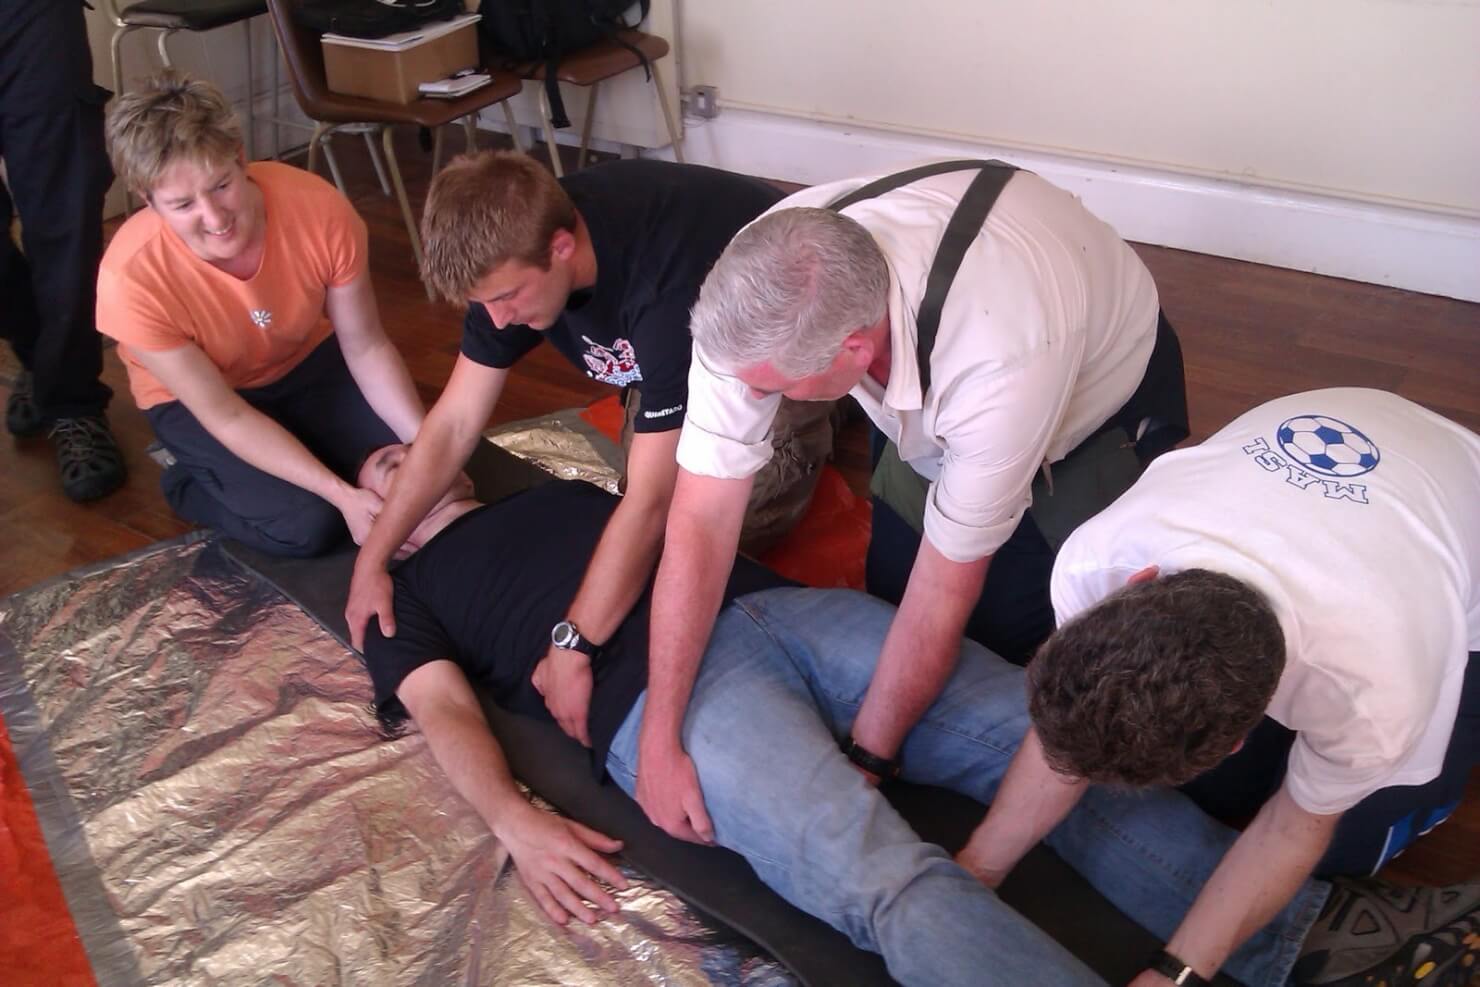
How to do spinal log roll (‘3 under 3 over’)
Place patient’s arms over their abdomen
Position 4 people – 1 at cranial end (co-ordinates roll), other 3 on the side that the roll will be towards
Hands firmly either side of patient’s head
Upper hand over opposite shoulder, lower hand over opposite hip (tallest person)
Upper hand over opposite hip, lower hand under opposite thigh
Upper hand under opposite calf, lower hand under opposite calf
i.e. upper 3 hands over, lower 3 hands under
When everyone is ready, coordinator says “Roll right 90˚ on 3, 1… 2… 3”
Separate person does what is required to the patient e.g. feels spinous processes
Need to see C7/T1 disc space (if not, get swimmer’s view)
Alignment (look for smooth curves)
Anterior vertebral body line
Posterior vertebral body line
Spinolaminar line (anterior edges of spinous processes)
Posterior spinous process line (posterior edges of spinous processes)
Bones
Peg of C2 sticking up
Should be smooth and flat
Atlanto-axial space should be <5mm in adults or <3mm in children (the space in front of the peg, before the posterior part of C1 tubercle)
Harris ring of C2 integrity (formed by: body of C2 anteriorly and posteriorly, and borders of the pedicles superiorly and inferiorly)
Trace around each vertebral body to look for fractures
Cartilage
Equal gaps between vertebral bodies
Soft tissues
Anterior para-spinal soft tissue width (line in front of vertebral bodies)
C1-4 = < a third vertebral body width
C5-7 = < whole vertebral body width
AP view
Spinous processes
Alignment in straight line (may need to go down middle of bifid processes)
Distance apart
PEG view
Outline bones and check gaps equal
Peg
C2 attached
C1 sides and their alignment
Note: up to 10% of fractures may not be visible on C-spine X-rays. If you are clinically suspicious of a fracture, consider CT scan to confirm/rule it out.
Image references
Cervical collar: Adapted from James Heilman, MD 2010. Licensed under the Creative Commons Attribution-Share Alike 3.0 Unported license (https://creativecommons.org/licenses/by-sa/3.0/deed.en). Sourced from: https://commons.wikimedia.org/wiki/File:Lateral_Collar.JPG
Log roll: used with kind permission from Merit Training (www.merit-training.com)
Canada rules: used with kind permission from Stiell I, Wells A et al. Canadian C-Spine Rule study for alert and stable trauma patients: I. Background and rationale. CJEM. 2002 Mar;4(2):84-90