2. Taylor francis 🧠: over 2500+ questions licenced from 18 text-books worth £191
3. Past examiners 🫁: Questions written by previous Medical School examiners
4. Track your performance 🏃♀️: QBank uses intelegent software to keep you on track
The reviews are in
★★★★★
6,893 users
Don't take our word for it
"The stations you provide are strikingly similar to those I came across during my medical school finals (some even verbatim!), and I have tried many other exam platforms. I'm truly grateful for your priceless support throughout my final couple of years at medical school!"
Raza Q 🇬🇧
"It has absolutely everything for medical school, so many histories with detailed differential diagnoses, how to approach emergencies, commonly prescribed drugs..every kind go examination you’ll ever need in osces"
John R 🇬🇧
"Thank you SO MUCH for the amazing educational resource. I’ve tried lots of platforms and books with mock OSCE stations and yours is by far and away the best I’ve tried"
Ed M 🇳🇿
"Get this right away. So helpful for OSCEs but also general clinical learning and understanding. Wish I had brought it sooner"
Emma W 🇬🇧
"Without a doubt, your platform outshines all other OSCE resources currently available. In all honesty, I can confidently attribute my success in securing a distinction in my finals to OSCEstop."
Harish K 🇬🇧
"OSCEstop distinguishes itself from many other platform banks by offering a wealth of questions that mimic the demanding and complex aspects of our finals. This platform played a crucial role in ensuring I was ready for the level of difficulty that awaited me in my final exams."
Membership includes access to all 4 parts of the site:
1. Learning 📖: All notes, viva questions, track progress
2. Stations 🏥: 10 years of past medical school stations. Includes: heart murmurs, ECGs, ABGs, CXR
3. Qbank 🧠: 2500+ questions from Taylor Francis books, complete MLA coverage
4. Conditions 🫀: all conditions mapped to MLA, progress tracking
The reviews are in
★★★★★
6,893 users
Don't take our word for it
"The stations you provide are strikingly similar to those I came across during my medical school finals (some even verbatim!), and I have tried many other exam platforms. I'm truly grateful for your priceless support throughout my final couple of years at medical school!"
Raza Q 🇬🇧
"It has absolutely everything for medical school, so many histories with detailed differential diagnoses, how to approach emergencies, commonly prescribed drugs..every kind go examination you’ll ever need in osces"
John R 🇬🇧
"Thank you SO MUCH for the amazing educational resource. I’ve tried lots of platforms and books with mock OSCE stations and yours is by far and away the best I’ve tried"
Ed M 🇳🇿
"Get this right away. So helpful for OSCEs but also general clinical learning and understanding. Wish I had brought it sooner"
Emma W 🇬🇧
"Without a doubt, your platform outshines all other OSCE resources currently available. In all honesty, I can confidently attribute my success in securing a distinction in my finals to OSCEstop."
Harish K 🇬🇧
"OSCEstop distinguishes itself from many other platform banks by offering a wealth of questions that mimic the demanding and complex aspects of our finals. This platform played a crucial role in ensuring I was ready for the level of difficulty that awaited me in my final exams."
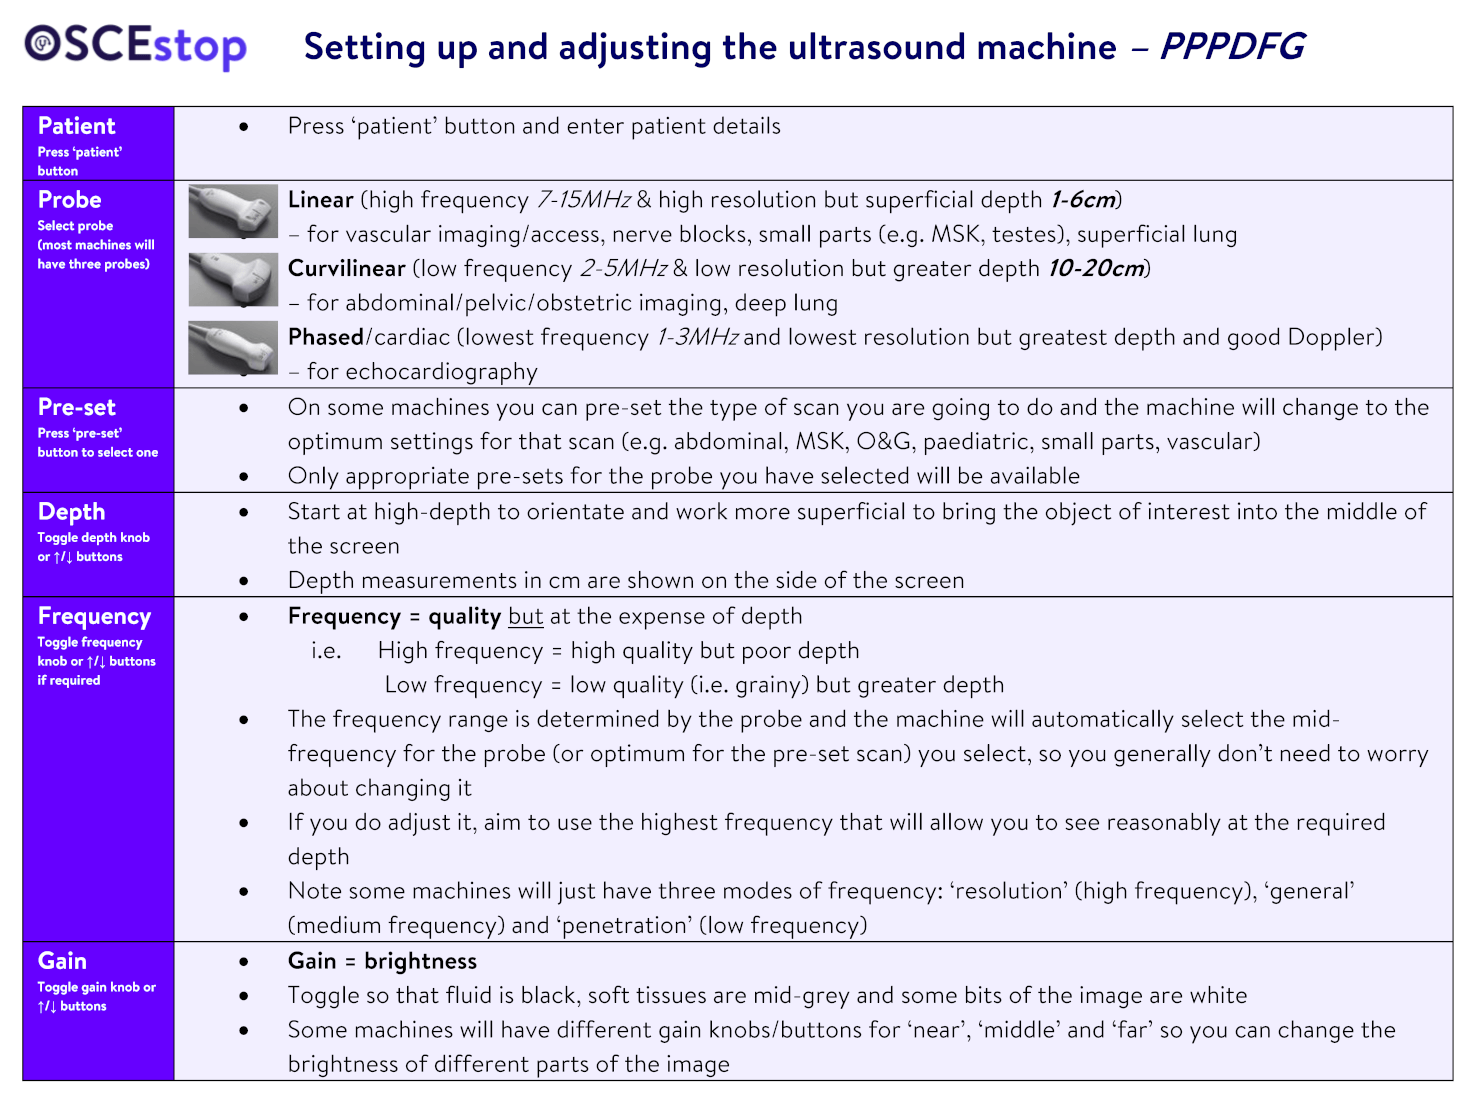
Procedural ultrasound: line up everything in a row – 1. You, 2. Probe and patient, 3. Screen
Abdominal ultrasound: traditionally scan standing on the patient’s right side (like you would examine them) while looking towards the screen, which should be at the head of their bed
Markers
The probe marker (a dot on the probe) should be orientated towards the patient’s right side (transverse) or their head (longitudinal)
This probe marker corresponds a screen marker on the left of the screen
The probe marker should be on the same side as the screen marker when scanning in transverse orientation (you can touch the edge of the probe to orient yourself)
EXCEPTION = CARDIAC PROBE: the cardiac probe marker should be on the patient’s left side and the screen marker is on the right side of the screen (the screen marker changes sides when you select the cardiac probe)
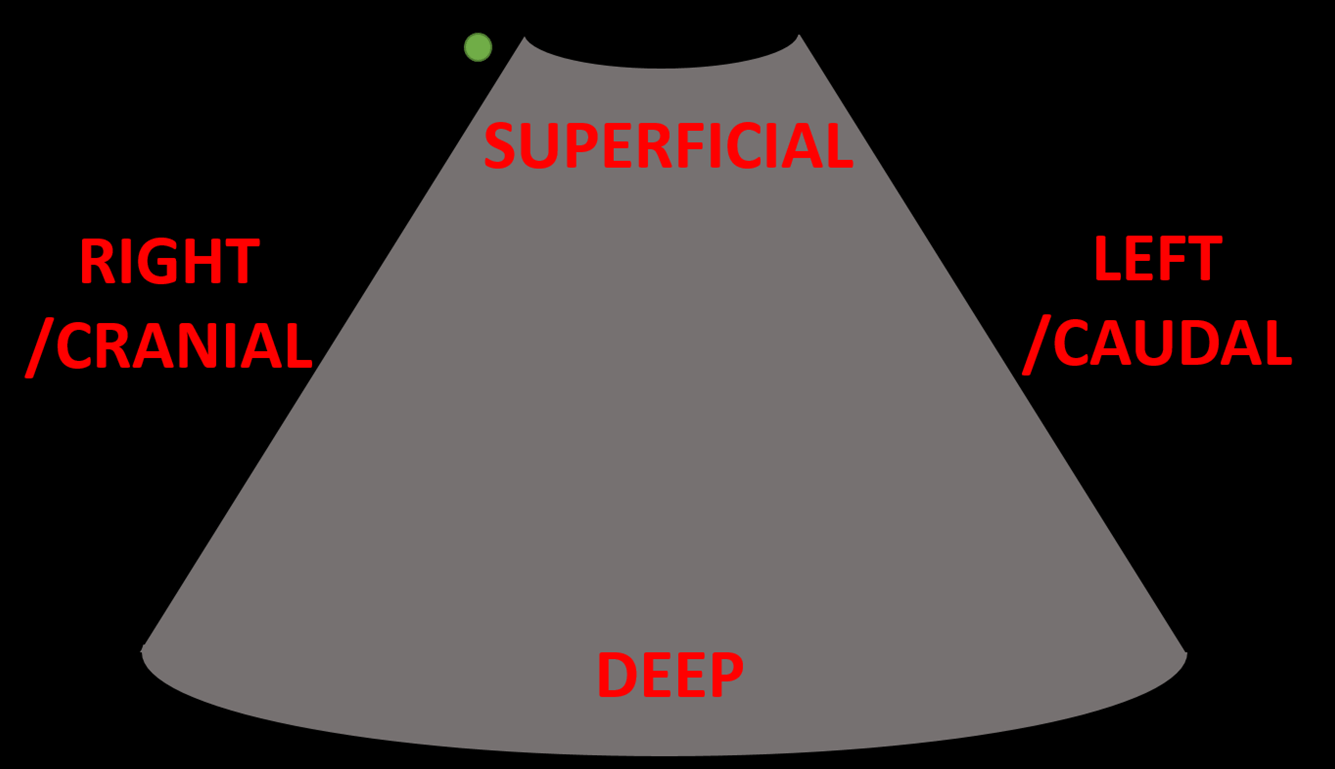
Image screen orientation
Transverse probe position: like CT and MRI imaging, axial slices of the patient are shown as if you are looking towards the patients head from the foot of the bed while they are lying supine (i.e. their left is on your right and vice versa)
Longitudinal probe position: sagittal/coronal slices of the patient are shown with the left of the screen (with screen marker) displaying more cranial tissues
Depth
The top of the screen (apex of a curvilinear image) is superficial and the bottom of the screen (wide base of a curvilinear image) is deep
Orientation
Tips for getting the best images
Use lots of gel
Press hard
Use a darkened room
Ensure the probe is perpendicular to the skin (less energy lost)
If there is bowel gas getting in the way, press hard to try and move it
Press ‘text’ and label the organ/view (e.g. distal aorta) and the probe orientation (LS = longitudinal; TS = transverse; LX = long axis; SX = short axis)
You should save images for all scans to prove what you have seen
At the end of the scan, when you press ‘end scan’ the saved images will be stored and can be exported
To measure something
Press ‘caliper’
An X will appear on the screen – move this to one end of the object you want to measure and press ‘select’
A second X will then appear on the screen – move this to the other end of the object and press ‘select’ again
The distance between will be shown on the screen
Press ‘B-mode’ or ‘2D’ to return to scanning
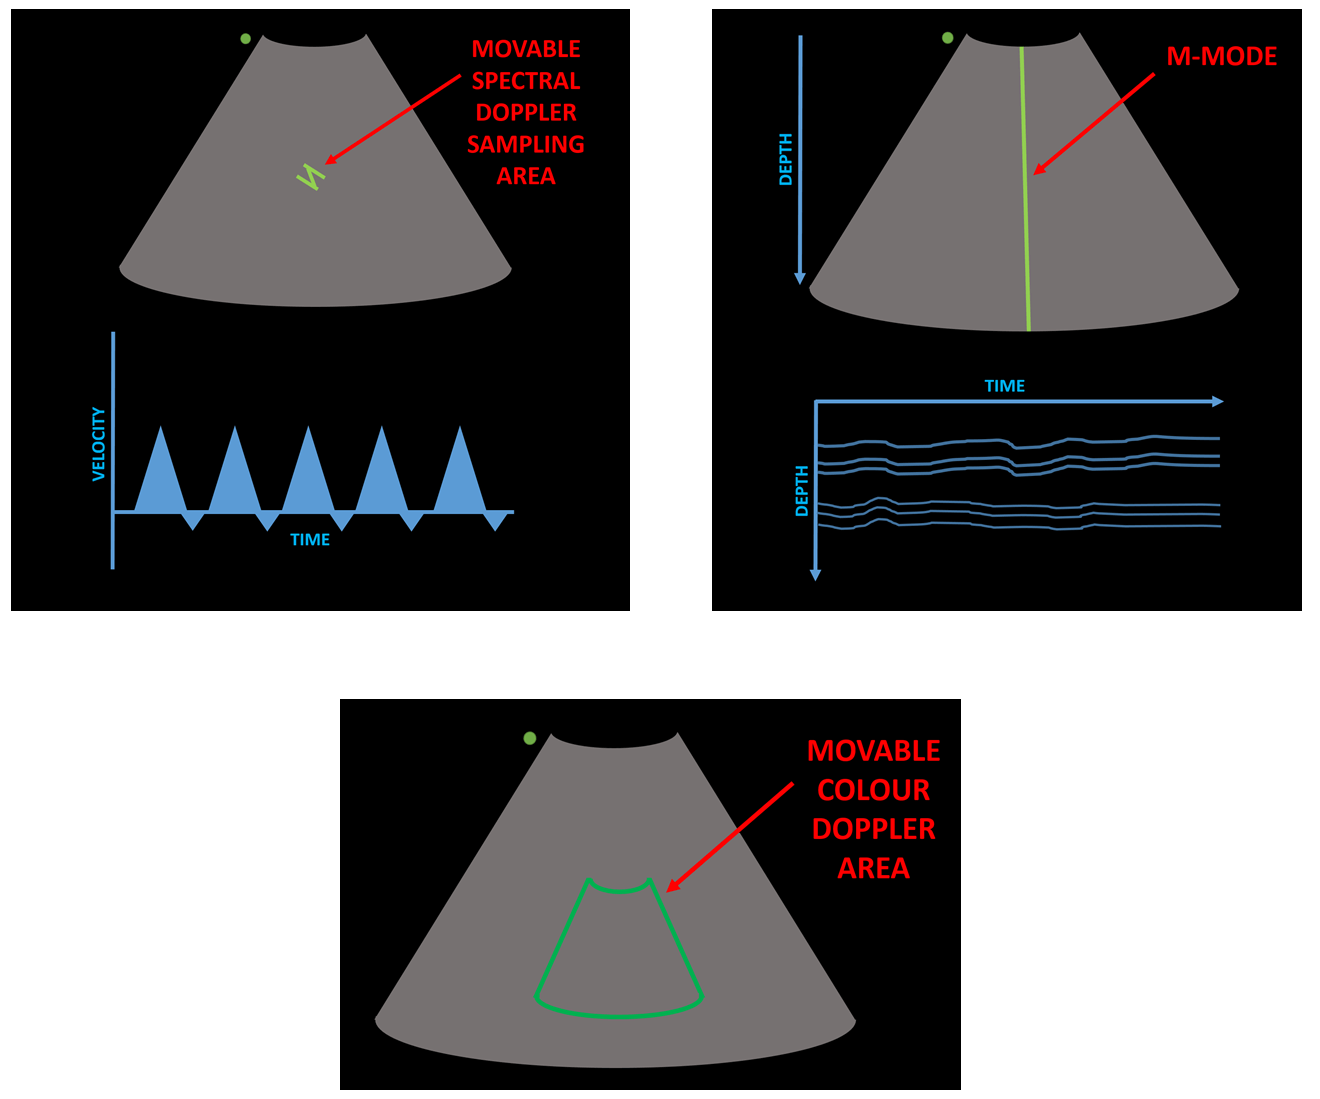
Scan modes
‘B-mode’ or ‘2D’ (brightness) = standard 2D pixel mode described above
‘M-mode’ (motion) = displays the motion along a single line of the ultrasound screen with time, displayed in a wave-like pattern on a graph
Commonly used in echocardiography to assess valve movement
The line can be moved with the machine arrows/touch screen
The depth on the graph corresponds to the B-mode image depth
D-mode (Doppler) = measures blood flow
Spectral/pulse-wave Doppler (‘Doppler’) – sound and graph produced from echos from moving red blood cells at a selected point of a B-mode image (usually used to confirm a vessel is an artery/vein)
Colour Doppler (‘Colour’) – adds colour to selected area of a B-mode image (red = blood flow towards probe; blue = blood flow away from probe)
Power Doppler (‘Power’) – adds colour to selected area of a B-mode image (any flow appears red/orange, whatever the direction; colour intensity is proportional to strength of Doppler signal) – more sensitive and less interference but can’t tell direction
The Doppler selection area can be moved with the machine arrows/touch screen.
Ultrasound scan modes
Bedside Ultrasound Scans
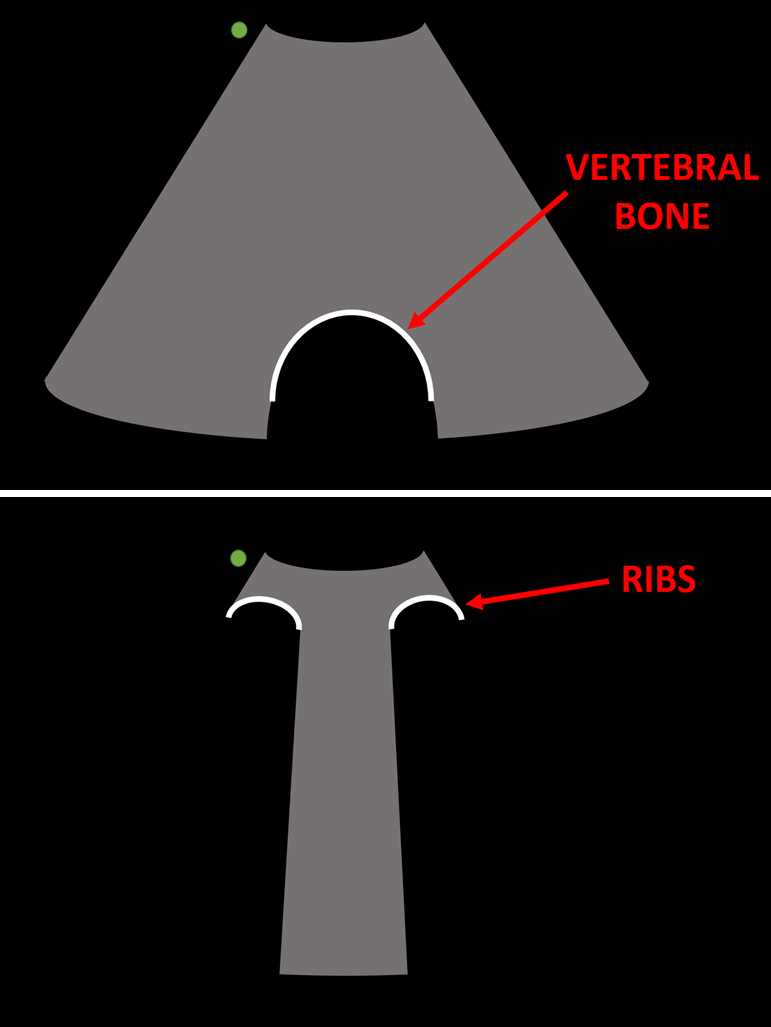
FAST scan
Curvilinear probe (~15-20cm depth)
4 views to look for free fluid in dependant areas after blunt or penetrating torso trauma:
RUQ (MoRison’s pouch) – coronal plane in right mid-axillary line (between 11th/12th ribs)
Most dependant part of the upper peritoneal cavity
Look for free fluid (a black stripe) between the liver and kidney
For this view, use you right fingers underneath the probe, right thumb above and rest your radial forearm border on the patient to stabilise
For the RUQ and LUQ views, the rib shadows often get in the way, so try tilting the cranial end of the probe slightly posteriorly to align the probe with the intercostal space
LUQ (splenorenal space) – coronal plane in left posterior-axillary line (between 10th/11th ribs)
Similar position to the RUQ but half a probe length more superiorly and further posteriorly (because the left kidney is further superior and posterior than the right as the liver is not displacing it)
Look for free fluid between the kidney and spleen
Blood also commonly collects above spleen
Pelvic – transverse then longitudinal plane 4cm superior to symphysis pubis (with the probe angled inferiorly)
Most dependant part of the lower peritoneal cavity
Look for free fluid outside bladder (around bladder, rectum and retrovesical pouch/Pouch of Douglas)
Sub-xiphoid – transverse plane in sub-xiphoid region (aimed towards heart)
Press probe hard into the sub-xiphoid region aimed extremely superiorly and slightly to the patient’s left side
Look for pericardial effusion
FAST scan
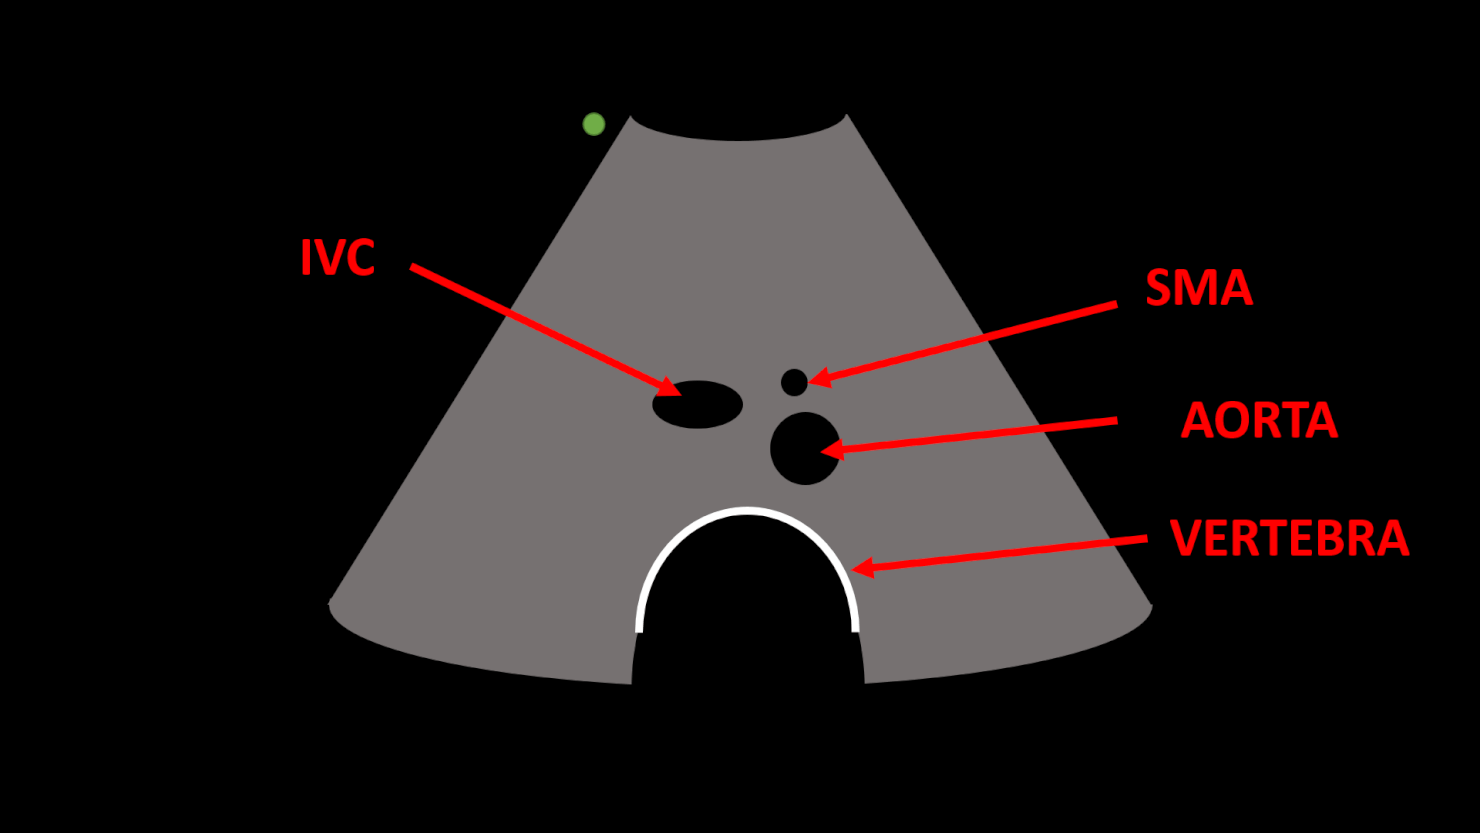
AAA scan
Curvilinear probe (~10-20cm depth)
Start superiorly in the epigastrium in transverse plane
Identify the anterior bright-white line of the vertebra posteriorly
Identify aorta anteriorly and to the left lateral side of the vertebra
Assess along the whole length of the aorta in transverse section
Look for aneurysms (>3cm is abnormal), atheroma and ectasia
Measure aortic wall (outer intima to outer intima) of the widest part in A-P (including any thrombus)
Longitudinal view
Assess along the length of the aorta in longitudinal section
AAA scan
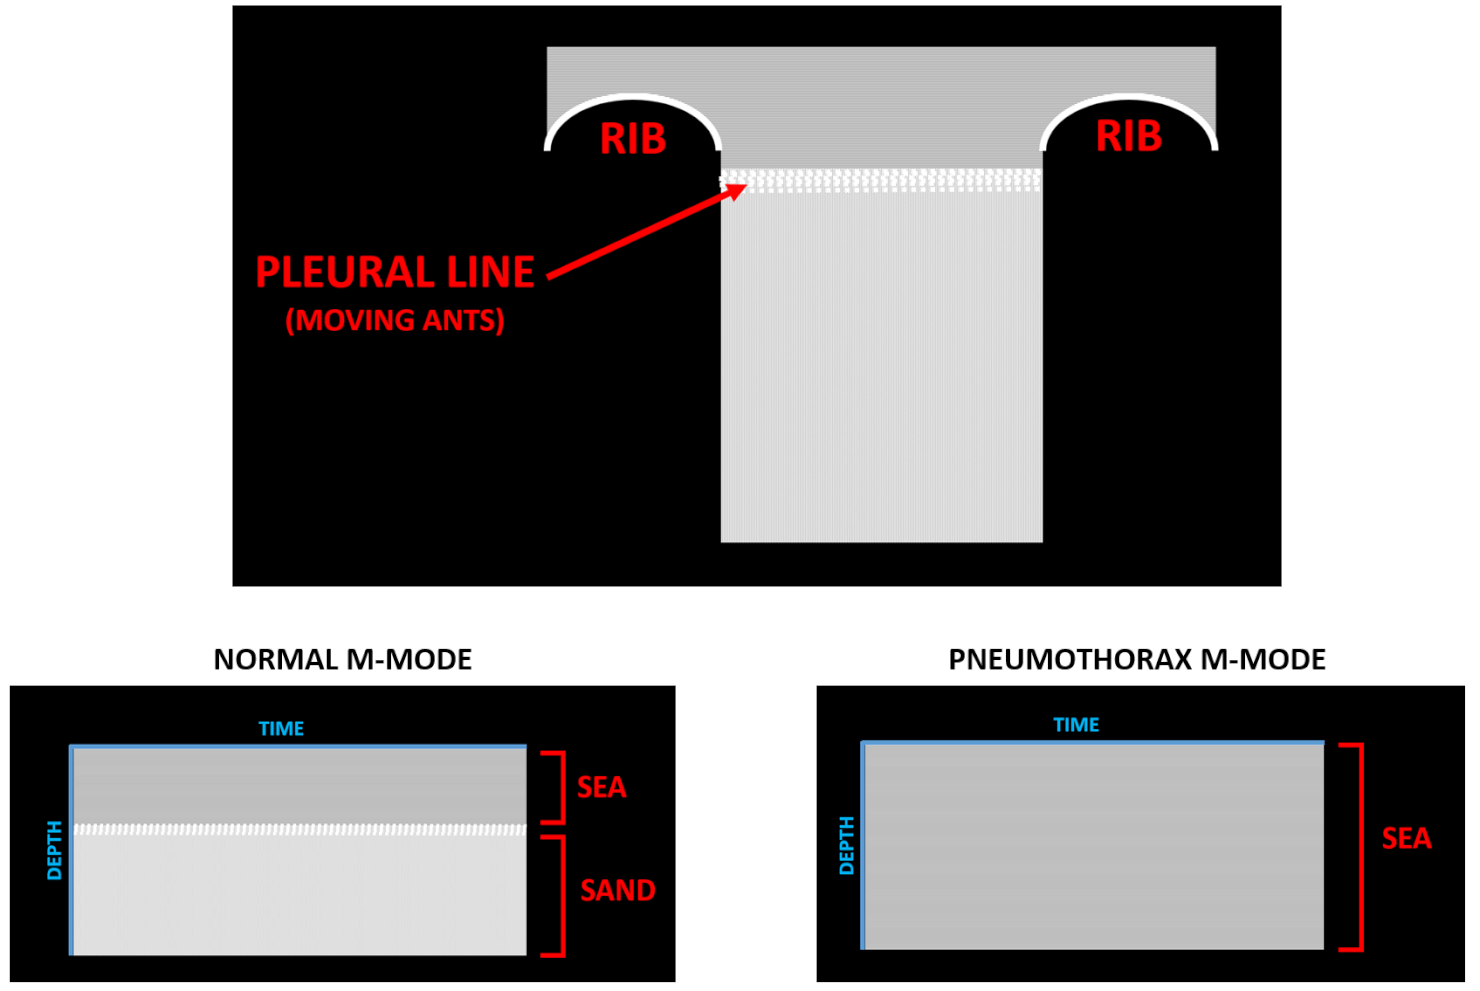
Lung scan
Linear probe (~5cm depth)
Uses artefacts to look for pneumothorax or pulmonary oedema
Pneumothorax
Position probe in longitudinal plane between 2nd/3rd or 3rd/4th ribs anteriorly
Look for the pleura deep to the intercostal muscles and ribs
2D: you should see a horizontal white line which looks as if ants are crawling in it (this is the two pleura rubbing against each other) – this is absent in a pneumothorax
M-mode: next use M-mode to look inbetween the rib shadows; the pattern made should look like sea at the top of the image and sand at the bottom of the image – in pneumothorax, the whole image looks like sea
Ultrasound can say if there is or is not a pneumothorax but cannot tell anything about the size
Pulmonary oedema
With probe in same position in 2D mode, look for B-lines (vertical black lines from pleura to bottom of screen)
Intensity and quantity of B-lines in proportional to extent of pulmonary oedema
Lung scan
Cardiac scan
Phased probe (~20cm depth) – remember the probe and screen markers are on opposite sides to the other probes
4 major views:
Parasternal long axis: probe just to the left of the sternum (~3rd/4th intercostal space) with the probe marker pointing to the patient’s right shoulder
Parasternal short axis: same but rotate so probe marker is pointing to the patient’s left shoulder. Fan probe up/down to get 3 sagittal slices
Aortic valve
Mitral valve
Papillary muscle
Apical: probe at cardiac apex
Subcostal: press transverse probe hard into the sub-xiphoid region aimed extremely superiorly and slightly to the patient’s left side
Cardiac scan
IVC scan
Curvilinear probe (~10-20cm depth)
Start superiorly in the epigastrium in transverse plane
Identify the anterior bright-white line of the vertebra posteriorly
Identify aorta anteriorly and to the left-lateral side of the vertebra
In cardiac arrest, the parasternal long axis cardiac view can be performed during a pulse check to look for tamponade and heart contractility.
Vascular access
Linear probe (~3-5cm depth)
Can be used for central lines (internal jugular/femoral) or peripheral lines
Need sterile probe cover and sterile gel for central line
Can be done with 1 person (probe in one hand, cannula in other) or 2 people (one to hold probe, other to insert line)
Approaches
Out-of-plane technique (transverse probe position) – view of vein and all surrounding structures but difficult to see needle (tip will appear as bright dot when in view and can’t be visualised all the way but you can see soft tissue movement by pressing the needle (‘tenting the tissue’)
In-plane technique (longitudinal probe position) – more technically challenging due to narrow beam width, but can see whole needle on the screen
Identifying vessels
Appear as black dots in out-of-plane view
In-plane view can be used to assess vessel orientation and length
Colour Doppler may be used to help identify vessels and sound doppler can help confirm if vessel is artery or vein
Artery vs vein
Arteries: pulsate, non-compressible
Veins: non-pulsatile, compressible
Technique
Out-of-plane view:
Ensure the vein is directly in the middle of the screen so you know where to aim for with the needle
Needle should be inserted at 45˚ and the insertion point is the same distance distal to the centre of the probe as the depth of the vein
You can move or tilt the probe to follow the needle tip
Flatten the needle once you are in the vein and advance the cannula/wire
In-plane view:
Insertion point is as close to the probe as possible
A more superficial angle can be used
Keep the needle exactly in line with the middle of the longitudinal probe and you can follow it down on the screen
Pleural drainage
Linear or curvilinear probe (~10-15cm depth)
Position patient sat on side of bed with arm crossed leaning on table
Scan inbetween the ribs (as USS can’t see through bone)
Use a longitudinal probe orientation and identify the liver/spleen, heart (if left side), diaphragm, collapsed floating lung and pleural fluid
Look for the ‘Quad sign’ – a quad image between the ribs shadow superiorly and inferiorly, the pleural line superficially and the lung line deeply
Mark insertion point
Ensure it is well away from heart
A large pocket of fluid
Beware of loculations in pleural fluid
Ideally perform procedure under direct ultrasound visualisation; however, if using an X-marks the spot approach, ensure the position of the patient does not change