Please note content is for educational purposes only and procedures should not conducted based on this information. OSCEstop and authors take no responsibility for errors or for the use of any content.
Indications: diagnosis or exclusion of possible meningitis, subarachnoid haemorrhage or CNS diseases (e.g. GBS, MS); relief of idiopathic intracranial hypertension
Perform CT head pre-LP for meningitis if: risk of ↑ICP (suggested by ↓GCS, focal neurology, pupil abnormalities, papilloedema, seizures); immunocompromised; known CNS lesion
**Check patients clotting screen, platelet count and if they have been on an therapeutic anticoagulant/clopidogrel**
Ensure assistant is available and make sure there is a chair for you to sit on next to the patient
Preparation part
Wash hands and apply apron
Clean a trolley
Gather equipment onto bottom of trolley (think through what you need in order)
Equipment list
Sterile pack
Cleansing snap-sponge (iodine or alcohol/chlorhexidine) x2
Sterile drape with hole in centre (or 2-3 drapes without holes in)
10ml syringe and 3 needles (1 blunt fill 18G drawing-up needle, 1 orange 25G, 1 green 21G) for local anaesthetic
Lumbar puncture equipment
Spinal needle (usually start with black 22G needle, or less flexible yellow 20G needle in larger patients)
LP manometer
Cotton gauze swabs (used whenever needed throughout procedure to dry/clean sterile area)
4 white-topped sample collection bottles (labelled with biro 1-4)
1 grey biochemistry sample bottle for glucose
Walk to patient
Wash hands
Open sterile pack to form a sterile field on the top of the trolley
Open packets (without touching the instruments themselves) and drop sterile instruments neatly into the sterile field
Pick up waste bag from sterile pack without touching anything else and stick to side of trolley
Patient part
Positioning and exposure
Expose patient’s back
Position patient
Lying on their left-hand side on a flat bed with their neck, hips and knees flexed as much as possible (foetal position)
Ask them to hold their knees as close to their chest as possible and touch their chin on their chest
Place a pillow between their knees and under their head
Locate insertion point:
Identify iliac crests
The disk space in the horizontal plane between the iliac crests is L3-4
The insertion point is mid-way between the L3/L4 (or L4/L5) spinous processes
Mark insertion point with a skin pen/indentation
Preparation
Wash hands
Apply sterile gloves using sterile technique (open pack on a side surface)
Sterilize area
Work from middle outwards in one spiral motion (use cleansing snap-sponge)
Repeat this with 2nd cleansing snap-sponge
Ensure you also clean the iliac crests (for repeat palpation)
Discard used snap-sponges as they are no longer sterile, but note all equipment used after this (including all needles) can be returned to the sterile field after use
Apply the sterile drape over the patient’s body so that the hole is in the correct place to allow access to the insertion site (or apply 2-3 drapes centred around exposed insertion site if no holes)
Anaesthetise tract
Ask assistant to snap open lidocaine bottle and hold open upside-down
Draw up lidocaine using drawing-up needle on 10 ml syringe
Change to the orange needle and insert at an acute angle to form a single subcutaneous bleb around insertion site in order to anaesthetise the skin
Change to the green needle and insert perpendicular to the skin to anaesthetise the insertion tract
This is done by instilling lidocaine in small increments of increasing depth
Always aspirate when advancing the needle (so you know if you get to the subarachnoid space) and aspirate before injecting lidocaine (to check you are not in a vessel)
Stop if CSF is aspirated (this will not occur in most people because the needle will not be long enough to enter the subarachnoid space)
Leaving the needle in (so you do not lose the position), disconnect syringe and wait 1 minute to take effect
While waiting for anaesthetic to work, assemble manometer if unassembled
Performing the LP
Needle insertion
Remove green needle used to anaesthetise the tract
Insert the spinal needle perpendicular to the skin aimed towards the umbilicus at the same insertion point as the green needle (with the bevel oriented upwards)
Use both hands – one gently holding needle close to skin to angle it, the other holding the needle slightly distally to provide necessary force
Slowly advance through the insertion tract, regularly withdrawing the stilette at small increments of increasing depth (observing for drips of CSF to determine if you are in the subarachnoid space)
The subarachnoid space is deep to the dura ( ̴ 5cm depth) where you may feel a ‘give’
If you strike bone at any point, withdraw the needle slightly, re-angle and advance again
Once you are in the subarachnoid space, CSF sill start to drip from the needle when you withdraw the stilette
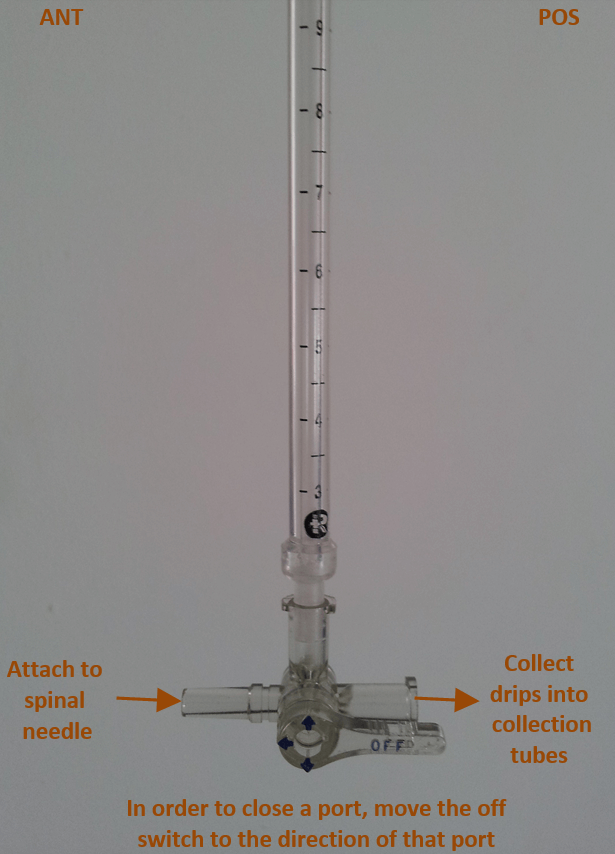
Pressure measurement
Remove the stilette and place back into sterile field
Connect the manometer to the needle via the 3-way tap (off switch pointing posteriorly to close posterior tap)
CSF will rise up the manometer
Note the pressure at the point it stops rising
Sample collection
Ask the assistant to place the collection bottles under the posterior tap in labelled order
When ready, turn the 3-way tap off switch anteriorly to close the tap connected to the spinal needle – allowing CSF to drip from the manometer gage into the collection tubes
When all the CSF from the manometer gage is used up, turn the 3-way tap off switch superiorly, to allow CSF to bypass the manometer gage and drip straight from the patient into the tubes
Collect 10-15 drops into each tube
Lastly, ask assistant to collect 5-10 drips into grey biochemistry tube
Completion
Remove the manometer and 3-way tap
Replace the stilette and then remove the needle (reduces headache incidence)
Comments are closed for this post.