Please note content is for educational purposes only and procedures should not conducted based on this information. OSCEstop and authors take no responsibility for errors or for the use of any content.
Patients with chest drains should be regularly monitored. Any unexpected change/deterioration should be promptly assessed and you should have a low threshold for seeking senior assistance. Keep the patient on the ward, and request an urgent portable x-ray if necessary.
Background knowledge
Complications:
Possible complications: surgical emphysema, haemothorax, pneumothorax, misplacement, organ perforation, blocked tube, re-expansion pulmonary oedema, infection
Patient:
Observations: of patient, drain and site should be done hourly for the first 4 hours post-insertion, then at least once per shift
Analgesia: chest drains are often painful and the patient must be able to cough and mobilise without pain – review regularly
Mobilisation and deep breathing: to be encouraged
Position: patient must remain upright (>45 degrees) and keep the chest drain below chest height
Drain:
Swinging: the fluid in the chest drain tubing should rise with inspiration and fall with expiration due to changes in thoracic pressure – ‘swinging’ – if this is not occurring it may indicate a blockage
Bubbling: bubbles coming from drainage tube into drainage bottle is normal in pneumothorax, abnormal in effusion
If a pneumothorax drain is not bubbling, it may be because it is blocked or the lung has re-expanded
If an effusion drain is bubbling, it may be because of an air leak – check the tubing to make sure all connections are sealed
Clamping: a (bubbling) chest drain for a pneumothorax should never be clamped without consulting a senior doctor as it can lead to a tension pneumothorax
Suction: is used for a persistent pneumothorax via a high volume, low pressure system – the patient should not leave the ward if on suction
Excessive fluid drainage: excessive fluid drainage (>1L/h) can cause re-expansion pulmonary oedema. Usually drain 1L fluid, then clamp for 1 hour – repeat cycle if excessive drainage continues. But remember, never clamp pneumothorax drain!
Problem with a chest drain
Assess patient
ABCDE approach: give oxygen if low sats, check tracheal deviation, chest expansion, bilateral breath sounds, signs of respiratory distress, as well as checking the observation chart
Check the chest drain chart: the drain output should be full documented. >1L fluid should not be drained within 1 hour
Respiratory distress after draining a large amount of pleural fluid: may be due to re-expansion pulmonary oedema – clamp the drain for 2 hours by closing the 3-way tap
Assess pain: ensure adequate analgesia. Severe chest pain may indicate the drain may have been inserted too far, irritating the diaphragm. Confirm with a CXR and then arrange for the drain to be pulled back and re-sutured.
Assess drain
Check drain position within chest wall: the drain may have fallen out if the sutures are very loose, you can see some holes around the chest or you can feel crepitus (a bubble wrap feeling) on the chest wall – if so, an impermeable dressing will need to be applied to the site and a new drain will need to be inserted
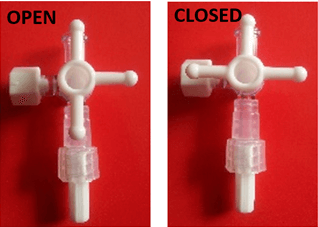
3-way tap: check it’s open to allow drainage
Check fluid is swinging: if unsure, ask patient to take beep breaths and cough. Note if the patient is on suction this will temporarily need turning off to assess swinging. If the drain is not swinging then flush it (see below). If the drain is still not swinging there may be a lot of debris so the water/tubing may need to be changed.
Bucket and bubbling: check there is water in the bottom of the bucket and all the tubing is connected (an air leak in the system will cause bubbling during inspiration and expiration).
If pneumothorax drain is not bubbling, flush it in case it is blocked (see below). If this does not work, order a CXR to see if the lung has re-expanded
If an effusion drain is bubbling: there may be an air leak – check all tubing connections and the 3-way tap position. If there is an air leak or tubing has become disconnected, encourage patient to cough to force air out and re-seal/replace the tubing.
Inspect drain contents: if new frank blood is present seek senior assistance. If change in fluid, assess patient for an evolving infection.
Flushing a chest drain
Flushing a small gauge chest drain (with 3-way tap)
Wash hands, open a sterile pack, drop equipment into it and then apply sterile gloves
Draw up 10ml of 0.9% saline
Ensure the 3-way tap is turned off to the side port
Remove the luer lock bung on the side port of the 3-way tap and clean port with alcohol 70% device disinfection wipe
Attach the luer lock syringe of saline to the side port
Turn off the 3-eay tap to the drainage bottle tubing
Inject the 10ml 0.9% saline
Turn off the 3-way tap to the side port and remove the syringe and replace the luer lock bung
Flushing a medium-large gauge chest drain
Wash hands, open a sterile pack, drop equipment into it and then apply sterile gloves
Empty 20ml 0.9% sterile saline into a sterile gallipot and draw it up into a bladder syringe
Clamp chest drain near chest wall and disconnect drainage tubing (keeping both disconnected ends sterile)
Clean distal end of chest drain with alcohol 70% device disinfection wipe
Attach bladder syringe into end of chest drain, remove clamp, flush 20ml 0.9% saline and then re-clamp
Ask patient to perform Valsalva manoeuvre or expire fully, then briskly pull drain out while an assistant applies steri-strips over wound (for Seldinger drains) or ties the previously placed closure (usually placed for large bore trauma chest drains)
Apply pressure for 5 minutes
Check bleeding has stopped and then apply impermeable dressing
Seek help from a senior clinician if the patient: is in respiratory distress, there is a sudden increase in fluid loss, frank blood loss, or any other serious concerns
Comments are closed for this post.